Welcome to the PublishingLab Frequently Asked Questions Page
Who is this for?
This section is for print designers or ePub developers working on KnowledgeMile or PublishingLab publications.
It aims to:
- clarify the workflow – showing you at what point the editor, designer and developer work on the hybrid outputs (markdown, epub, icml or html files)
- show you how to set up GitHub – accessing the files to work collaboratively with the editor
- list common problems & solutions in InDesign workflow
- list common problems & solutions for ePub development
This page is a work-in-progress, so if you face challenges outside the scope of this, please contact us with the specific issue (including screenshots) and we’ll work with you toward a solution.
Good luck,
the PublishingLab team
Workflow Diagram
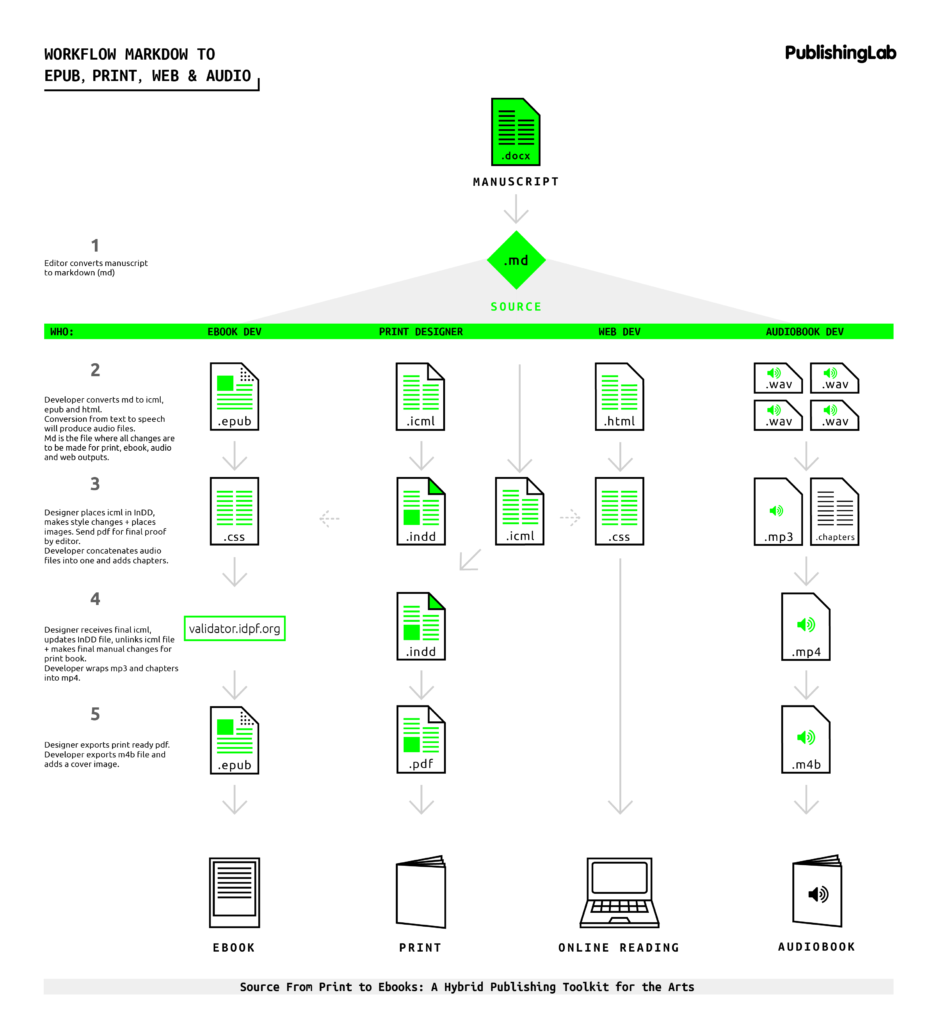
Download here the pdf of the Workflow Diagram.
The short video below shows you through a typical workflow from manuscript to sourcefile to collaboration (using GitHub) to multiple outputs.

The video provides a brief overview of the process from manuscript to multiple outputs, using the Sausage Machine platform:
Get started with GitHub
Git is a version control system that the PublishingLab uses to keep revisions (to a book) straight, and store the changes in a central repository. GitHub is the application we use to keep track of the revisions and collaborate between editors, developers and designers.
You will need:
1. A username for GitHub (for example, msdoe)
to sign up for a username: join here
2. GitHub Desktop (download it for mac or windows here)
3. Send your GitHub username to the editor so they can add you as contributor to the book project (repository*)
The GitHub workflow:
- the editor creates markdown + icml files
- the editor uploads the files to GitHub
- collaborators receive the project url (ie https://github.com/DigitalPublishingToolkit/BookTitle )
- if editorial changes are made, new icmls are generated and pushed to GitHub, this means collaborators can pull changes from GitHub and re-link the icml files in InDesign to be up-to-date with the latest text.
How to access the icml files for InDesign:
- navigate to the project from the github url supplied by the editor
- click ‘Clone in Desktop’
- open with GitHub Desktop
- specify where you want the folder to go
- click sync to get the latest files
- view the files on your computer: in GitHub right click the folder on left to see it in Finder
Now you have the latest files, you can place the icmls in InDesign. Create a new InDesign document, then navigate to file > place and select the icml file.
Note: make sure you are signed into GitHub online with the same account that you are signed in to GitHub Desktop.
*repository or ‘repo’ is just another name for a storage space, where all the project files are located.
More resources for using GitHub
Clone in Desktop – the same as steps above with a few more details
If you want to work with GitHub, there’s a useful help section here.
Common InDD & icml Problems & Solutions
versions tested: InDD CC, InDD CS6, InDD CS5.5
problem
I cannot apply styles or make manual edits after placing the icml file
Translation:
This is likely because your icml file has not been “checked out” – this means that the incopy file is able to be edited by everyone, but restricts edits to what’s already been marked up in the document. To make manual edits and add images, you need to check out. When saving the file, InDD will ask you to check back in, say yes.
solution
edit > incopy > checkout (Command+F9)
problem
When updating the linked icml file, the manual changes & images disappeared
Translation:
This will happen. Manual changes, like fixing widows or orphans, need to be left until the end when the editor has submitted the absolutely final file. For the first design draft, it’s important to include images in the correct position in the content, however please note that they will need to be relinked in InDD when you have the final icml file.
solution
Image frames will have a little crossed pencil icon, double click this to relink to the image.
For the last design, wait until you have the final icml file from the editor so that you can UNLINK your InDD document, finish manual edits and create a .pdf.
problem
New paragraph styles I created were no longer applied to the text when updating the icml file
Translation:
The icml files contain markup in the form of headers, paragraphs, blockquotes, footnotes and tables. The editor’s role is to assign this markup to the content (md file) before you receive the icml. If you notice there are some headers missing for instance, please inform the editor so he can fix the file. Note: In the case of the author name – which has a special class, you will have to create a paragraph style for author & apply it twice: in the first round and in the final updated InDD file. This should be the only instance of repeated paragraph styling.
solution
Create the new paragraph styles necessary (ie author name), inform the editor of any un-marked headers, blockquotes etc, and wait for the final icml file.
problem
I was working on the InDD file and at some point couldn’t make any more manual changes
Translation:
The cause of this issue may be because of an idlk file. InDesign Lockfile is generated by InDesign as soon as you open an InDD file, this is to prevent someone else opening the same file and making changes simultaneously. It is possible that while you were working on an InDD file, someone else opened it and somehow you are ‘locked out’.
solution
Move the idlk file to the trash.
FAQ
What do these InDD symbols mean?
globe+arrow: indicate anyone can edit in InCopy crossed pencil: indicates missing link to an image/text, equivalent to the ? icon that indicates missing links
problem
No styles are attributed to text after I place icml file
Translation:
This doesn’t happen with InDD CC, but it may occur when the link to the icml is broken.
solution
First check your links panel in InDesign and relink any broken links. Then contact the editor.
The editor should check the markdown file has been correctly formatted, ie # = header 1, and test the icml file before sending to designer. Designer to send screenshots of the problem to Editor for problem-solving + tell the editor the InDD version you are working with.
problem
when I place the icml, it all looks like default styling
Translation:
InDesign should automatically create all the Paragraph and Character styles named in the .icml (based on what you had in the HTML, including class names for paragraphs and spans). But in a new InDesign doc, they may show default fonts, so you’ll need to spend some time defining the style attributes in the InDesign document.
solution
Check out the icml file and spend some time defining the style attributes in the paragraph styles panel.
Or place the icml files into an InDesign template (.indt) file you’ve already set up. The paragraph styles will be applied and you will just need to check they’re consistently applied.
FAQ
Footnotes: some are long and flow over two pages, but the line above is not the same on both pages.
Translation:
The inDD template file we provide you with shouldn’t show this problem, but it just means the footnote style is only being applied to the first page of the footnote.
solution
You will need to go Type > Document Footnote options >Layout > Rule above, select the continued footnote options. This means whenever there’s a long footnote the same style applies over both pages.
FAQ
Why is there a tmp.icml file in the folder?
Translation:
A TMP file is just a temporary file that’s automatically created as you make a new file, you can safely ignore it.
FAQ
There’s an unassigned icml in my assignments panel, will this affect my workflow?
Translation:
In InDesign, assignment files are containers for organizing collections of page items. For example, you might want to select all the items in a story (headline, byline, copy, graphics, and captions), and then assign them to one InCopy user. Adding those items to an assignment provides a convenient way for InCopy users to access only the content for which they are responsible. Only InDesign users can create assignment files; only InCopy users can open them. You will not be assigning items with the HPToolkit Workflow, so it’s safe to ignore.
Solution
We aren’t using an InCopy to InDesign workflow, so this will not affect your ability to work on the file. The crossed pencil means the file needs to be accessed via InCopy. Ignore it.
FAQ
What is the designer’s role in the PL workflow?
We have a diagram explaining the workflow here but the designer creates the final book and influences the visual outcome of all three mediums: print, ebooks and web (if the book is created in html). The styles the designer chooses are important, and there will need to be a collaborative relationship between the designer, editor and developer.
The copy editor will start by making changes to the original docx file, then the editor checks edits in the markdown file. That markdown file is converted to an icml and laid out in InDesign. Once the document has all the images in and all paragraph styles decided a .pdf proof is sent to the editor. The editor can print this and make final changes, which will be updated in the markdown before a new icml is made and the designer can finish by updating their file, unlinking it and making the final manual changes necessary.
Translation:
This means the designer engages with the content twice: broadly creating the layout using the first icml text and then fine-tuning details once the editor has made their last changes.
problem
I updated the icml file and nothing is marked up or styled
Translation:
This is likely caused because the link to the icml hasn’t correctly linked, you will see no H1 headers applied and the whole text is set in minion pro or another default font. The links panel likely has a little yellow notification warning you of the broken link.
solution
Check your links panel, relink any broken links.
problem
I used pandoc to convert a document to ICML but when I try to open it in InDesign, I’m told it’s invalid. What went wrong?
Translation:
Be sure to use the -s or --standalone flag, or you just get a fragment, not a full document with the required header:
solution
pandoc -s -f markdown -t icml -o my.icml my.md
More help
Pandoc has its own FAQ section which can help you solve other issues you might come across.
Common ePub Problems & Solutions
problem
name of error: No rule to make target
Translation: Pandoc is expecting to find a file name ending in .md (markdown) but because of the space in the file name it stops.
make: *** No rule to make target
md/Hybrid', needed byepub’. Stop.
This error is almost always caused by a typo – make sure your file has no spaces in the name. You can see it stopped after /Hybrid – which is the first word in the title below before a space.
Solution
Incorrect:
Hybrid Publishing Workflow.md
Correct:
Hybrid-Publishing-Workflow.md
problem
pandoc: Could not parse YAML header: UnknownAlias {_anchorName = “The”} “source” (line 2259, column 1)
Translation: What does this error mean? This error means something’s gone wrong in the metadata section at the top of your file.
YAML is the language used for the metadata block in our Markdown source files. If there is an error in the metadata, pandoc will give this ‘Could not parse YAML header’ message. This is usually caused by spaces or characters being in the wrong place according to YAML’s structure.
Pandoc has more about epub-metadata on: http://pandoc.org/README.html#epub-metadata.
There are a few things to be aware of: line lengths – very long lines that go over 2+ lines need to have ‘[long line]’ single quotes around them.
You can find out more about YAML on wikipedia.
Solution
You can use the YAML validator to help you find out more about your error using yamllint.com. The issue can be caused by using markdown syntax in part of the md file that is meant to be YAML.
incorrect: Abstract: * The Hackable City* is…
correct: Abstract: The Hackable City is…
The difference here is that using single asterisks is a way to use markdown to make these words italic – unfortunately this is incorrect in YAML and will produce an error.
There is no single solution yet: keep an eye out for weird syntax and keep changing parts of the metadata in the validator until you’ve found the problem.
problem
C02Q52SEG8WM:HackableDEF-copy zylvj$ make book.epub
rm -f md/book.md
rm -f book.epub rm -f ~ /*~ #emacs files for i in md/HackableFINAL.md ;
do ./scripts/md_stripmetada.py $i >> md/book.md ; \
./scripts/md_urlize.py md/book.md ; \
done Traceback (most recent call last): File “./scripts/md_urlize.py”, line 27, in <module> from django.utils.html import urlize ImportError: No module named django.utils.html make: *** [book.md] Error 1 C02Q52SEG8WM:HackableDEF-copy zylvj$
solution
download & install django or – remove this script for TOD and see if the book works without it
Translation: This script uses another program, django, but you don’t have it installed on your computer.
problem
font problem: italic styles render in iBooks as bold italic
Translation: The styles.epub.css file needs to be customised if you want to apply specific typefaces to your ePub. This means you need to use @font-face as well as listing your fonts in the src:
You also need to add a line of code to your makefile to embed the fonts into the ePub. –epub-embed-font=../lib/*
### solution
The solution consists of 3 parts: make 2 changes to the css + 1 to the makefile.
css
incorrect: @font-face { src: Open Sans-LightItalic; format(‘opentype’); }
correct:
@font-face { font-family: ‘OpenSans-LightItalic’; font-style: italic; font-weight: 300; src: local(‘Open Sans Light Italic’), local(‘OpenSansLight-Italic’), url(open-sans-v13-latin-300italic.woff) format(‘woff’); src: local(‘Open Sans Light Italic’), local(‘OpenSansLight-Italic’), url(open-sans-v13-latin-300italic.ttf) format(‘truetype’); unicode-range: U+0000-00FF, U+0131, U+0152-0153, U+02C6, U+02DA, U+02DC, U+2000-206F, U+2074, U+20AC, U+2212, U+2215, U+E0FF, U+EFFD, U+F000; }
incorrect: not specifying a style for italic
correct: p.italic { font-family: “OpenSans-LightItalic”; font-style: italic; }
make file
incorrect:
not having –epub-embed-font in your makefile means default fonts will be used.
correct: –epub-embed-font=../lib/*
FAQ
how do I make a border box for some content?
Translation: There is content in the book with statistics/info that needs to be inside a box. We have created css styles for this with a class=”statbox”, indicate it in your markdown file and it will be styled according to the css.
solution
this is a statbox in md
27% of people believe made-up statistics. This statistic is 90% made-up.
css .statbox { font-size: 0.75em; font-family: ‘OpenSans-Light’; border: 1px solid black; padding: 20px; outline: black solid 1px; outline-offset: 5px; margin-top: 2em; margin-bottom: 1em; }
problem
footnotes repeated or not formatted
Translation: The footnotes are styled in the .css file, problems are most likely caused and fixed there.
solution
Have a look at the css file in the epub folder, it is possible there are 2 styles defined for footnotes. Comment one style out or delete it so it doesn’t affect the footnotes in the ePub.
FAQ
Fonts
Optional fonts:
lib/ - folder for storing custom fonts, that will be used in the EPUBNote on the use of custom fonts: If you choose to use fonts, make sure to change the makefile to include the use of fonts in the makefile epub rule, such as in the rule bellow, where –epub-embed-font=lib/UbuntuMono-B.ttf was added to allow for the use of the Ubuntu Mono font. Also include the font on th EPUB style-sheet with @font-face rule
problem
Fonts not rendering
Translation Instead of seeing the custom font I’ve chosen for the book, I see a default. You need to reference the fonts you use in the .css file and in the makefile – the line below tells the makefile to embed this font in the ePub file.
Check your css to see that the src of your custom fonts is linked to the correct folder, which should be called ‘lib’.
solution
Check your makefile under epub: section you need to include –epub-embed-font=../lib/*
#### css incorrect @fontface … src: url(‘../fonts/open-sans-v13-latin_latin-ext-300.eot’);
correct src: url(‘../lib/open-sans-v13-latin_latin-ext-300.eot’);
problem
My book is called ‘Main Title’, which is the incorrect title
Translation: You need to update the metadata.xml file so that your ePub has the right title, author, isbn and other important info related to it. This is a good indicator it hasn’t been updated and is showing the default placeholder text.
solution
Open the metadata.xml file inside the epub folder and update the details. You can find a more info about metadata here: https://publishinglab.networkcultures.org/blog/2015/09/25/metadata-schmetadata-whats-it-good-for/
FAQ
how do I use pandoc to create epubs?
Translation: Pandoc is a converter, you need to first install the latest version. You can download the package file from http://pandoc.org/installing.html
solution
Pandoc is an application you need to run via command line, note that it doesn’t have a graphical interface. Read up on pandoc.org, there’s a guide to set it up & Andre Castro also has step-by-step instructions on how to use it to turn a manuscript into markdown, epub or html here.
problem
The Table of Contents doesn’t show all my chapters (marked by # H1 syntax)
Translation: The ePub is not rendering the # as H1 header markup, and instead probably just thinks you mean hashtag.
The issue looks like this (with text after the # styled as normal paragraph instead of as a Header 1):
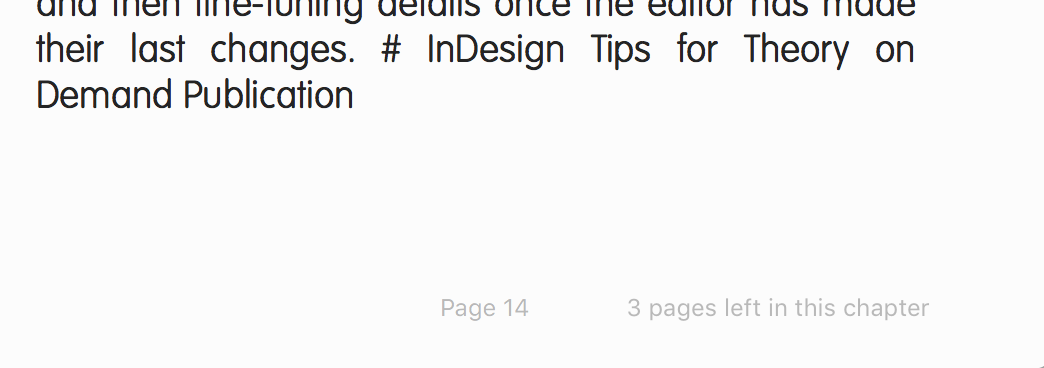
solution
Make sure all your files have an empty line at the end, otherwise when book.md is created (which combines all the md files) it just reads the first # as a continuation of the sentence before.
For example, if you have 3 chapters and only 2 show, check the end of chapter 2 and add a line space after the last sentence. Create ePub again, this should fix the problem.
problem
When using pandoc & the makefile to ‘make epub’ I get an error 2, like this:
/bin/sh: -c: line 0: syntax error near unexpected token `done’
/bin/sh: -c: line 0: `cd md && pandoc –from markdown –to epub3 –self-contained –epub-chapter-level=1 –epub-stylesheet=../epub/styles.epub.css –epub-cover-image=../epub/cover.jpg –epub-metadata=../epub/metadata.xml –default-image-extension png –toc-depth=1 -o ../book.epubbook.md ; done’
make: *** [epub] Error 2
Translation: This error occurs sometimes on Mac but not on Linux systems, it is a syntax error (basically it tells you something’s wrong with the sequence). It will stop the makefile from actually creating an epub file, but if you remove the word done and try ‘make epub’ again, it works.
solution
remove the word done at the end of the epub section in the makefile.
problem
The ePub has doubled the content
Translation: It’s likely there is a tmp.md file in the md folder with your other files, when you make an ePub using the make file a book.md file is generated which combines all the .md files and it is including this tmp.md folder unnecessarily. It is safe to remove it and then you’ll have the content displayed just once.
solution
delete the template.md or tmp.md file
problem
Translation: This error message will pop up on GitHub desktop when you have logged into a different account online to the desktop account.
solution
Make sure you sign into the same account both online and on the desktop GitHub application. Go to GitHub Desktop > Preferences > Accounts and sign in.
Then, go to your command line (terminal on mac) and type git config –global user.email “you@example.com”
use the same email you use to log in to GitHub.